Thursday, June 30, 2011

Pansey Pattern

Happy Thursday!!!  

Only one more day till the weekend!  I can't wait...how about you?  I always look forward to the weekend because I am usually able to find a little stamping time...especially if hubby finds some golfing time!

Well if I get some time to stamp I know I will be playing with some more of 

Have you checked them out yet???
They are so cool and enable you to make some really unique projects!
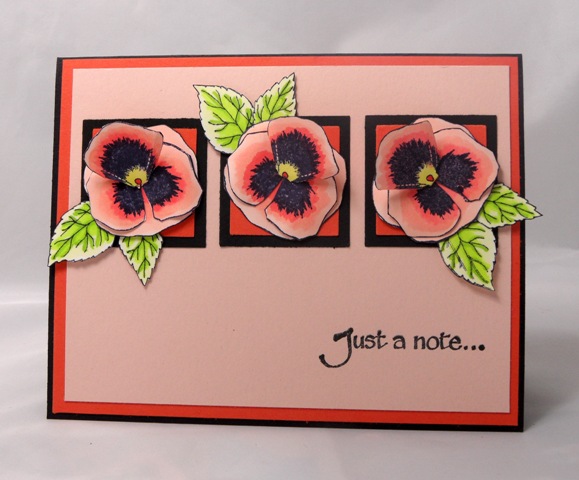
Today I am sharing a few projects that I made with the Pansey Pattern.

Here's the first one that I paired with "Live Well".


The sentiment on this one is "Whenever I think".


and finally...I used "Just a note" for this card.

The design team ladies have been sharing terrific 3D samples all week.  

You should check them out and give them a try! Your friends and family will be so impressed!

Have a great rest of the week!

Kristine

Wednesday, June 29, 2011

Tags Are So Handy

16220 Bouquet from QKR Stampede is such a pretty floral image to use. I decided I could use a few tags to have in reserve for those times I am wrapping up a quick gift.

I started by stamping and embossing in clear this bouquet on a tag shape. I used Tim Holtz distress ink to bring out the image -sort of a resist type project.
I colored another stamped image, and colored with Copic markers. This one was fussy cut and pop dotted in layers and added to the tag.
All I did was add lace and fiber to tie with. voila!!

There are so many wonderful floral stamps  available at QKR Stampede- and also several other stamps that could be used to decorate a bookmark.
Hope you pop in and check a few out.

Little Turtle


The flower images includes the three flower you see on the left so after stamping the turtle I masked off the image with a post it note and stamped one more flower to the right; I also masked off the rubber to avoid inking part of the petals and leaf when stamping the single flower.

Copic markers were used to color the images: 0, 100, BG11, BG15, BG18, E21, E33, E37, E95, G05, G09, G94, R35, R39, W3, YR04, YR07, Y15. Y19, Y38

The clouds are freehand drawn and cut out then using a metal ball stylus I embossed the back to puff them up and mounted them on the card with foam pop dots.

The image panel and border are also popped up with foam rectangles.

Images: Biblical Impressions: 80508- Turtle, 38806 Daisy Garden
Paper: Unknown Aquarelle Arches watercolor paper (base), Strathmore Bristol smooth (image and clouds), The Paper Company – turquoise
Ink: Memento – Tuxedo Black
Accessories: Foam pop dots, copics
Tools: metal ball stylus

Tuesday, June 28, 2011

4th of July Layout

Today I wanted to share a scrapbook page I made for 4th of July using some Biblical Impressions images. I started with some fun festive paper from Bo Bunny. I then added 2 images to my LO. I used the Flag Girl image and the God Bless image. Here is how it turned out.Kinda hard to see the images in the photo with the page being 12x12, so here is a close up. 
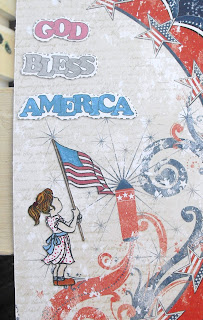
I started by coloring the words with metallic gel pens, then fussy cut them. Next I colored the little girl with gel pens and markers. I fussy cut her out too. I ran all the images through the Xyron to get them nice and sticky. I attached them to the page. A very simple LO, but I thought it turned out cute. Now I just need to wait until Monday to get a picture of my girls for this page! That is all for now, thanks for stopping by!

Razzleberry Flower Basket


Good morning! It's Holly posting today. I was in the mood to color one night, and I just let the feeling guide me in picking out these colors to use on this gorgeous Flower Basket from Eureka. No, these are not my normal colors, but what can I say? I was just having fun and these colors just wanted to come out and play that night.

I paired this Flower Basket with some papers from Prima and some Razzleberry cardstock and ribbon. I sponged some Antique Linen distress ink over the colored flower basket to give it a vintage feel. I love how this turned out. :-)

Stamps: Flower Basket from Eureka
Ink: Tuxedo Black Memento, Antique Linen distress
CS: Razzleberry, White, Botanical dp (Prima)
Other: circle die, lacy circle die, Copic markers, sponge, Razzleberry satin ribbon

Birthday Bear


Is the conviction that is already half a year?
Where only the time gone? She runs and runs.
Yesterday we had in Germany after a long time once again a really nice summer day. That was really nice.

 
Today I have brought you a card with a image from
QKR Stampede. It is the stamp "Birthday Bear" .
He is so cute. I love him ;-)


I colored this image with distress ink

Have a nice day

Monday, June 27, 2011

Big Orange Fish

I have another 3D image to show you today.

 I stamped the body of the fish with Memento Tuxedo Black so I could see the detail. Since the fins have dots and dashes to guide you through the scoring and folding I didn’t want it to show so I stamped with Stampin Up Barely Banana.

The set of images comes with directions for you to follow during assembly and it goes together pretty quickly. It would make a great mobile if the images were glued them back to back…someday maybe!

Copic markers to color the fish: YR04 and 12, Y13 and 19, BG18, 100,
And the Martha Stewart punched plant life G94 and 99.

The brads are punched paper attached to cardstock for strength and a real brads hold them to the card panel.

Stickles was applied to the waves and body.


Images: Eureka Stamps28901 Fish Pattern, 57801 Trellis Background
Paper: Marcos white, Bazzill green, light blue, unknown designer papers
Ink: Memento – Tuxedo Black, Stampin Up Barely Banana, Certainly Celery
Accessories: Stickles, Aleene’s tacky glue, Copic markers
Tools:  paper piercer for brad holes, metal ball stylus, Martha Stewart grass punch

Sunday, June 26, 2011

The Majestic Wolf

American Indians put much significance in the importance of their spirit guides. The wolf is one of those important ones.
Eureka Stamps has one of the best wolf images I have seen- really this majestic wolf is beautiful.
So do you think he lives up to my words?
Very basic card- but so impressive with this handsome 
36501 Wolf.
 I used some Copic markers to accent him and the greenery That is fibers I tied on the side. Image was matted with some embossed card stock that looks like leather.
Check out  QKR Stampede's  3 stores

Saturday, June 25, 2011

Lion Kiss

It's Roxie here hoping your weekend will be a great one! 
I'm one of those stampers that loves all types of images but if I had to pick a few favorite themes one would be the wild animals of the world and Lion Kiss would be among them.  It's such an easy image to color and cut out and really stands out against the quick and easy alcohol inks background.
The image was colored with Copic markers: 0, 000, E21.E25, E29, E33.

The background was created with Ranger alcohol inks: cranberry, wild plum, sunshine yellow. For the sun I cut a round piece of felt (if you have round die cuts run it through the machine a couple times to make the cut) loaded it with ink ad placed the felt on the glossy paper and did a twist motion. I save the piece of felt to use again so there may be a color mix of butterscotch ink. I then apply the other two colors and when it’s dry I stamped on the tree images with StazOn Jet Black.

The lion image is attached over the glossy paper background using both tape and Aleene’s tacky glue for corners.

All the yellow panels were ink distressed with Spiced Marmalade Ranger Distress Ink and the brown with Vintage Photo.

The triangles are created with Stampin Up’s photo corners punch and glued to the card then I used the SU mat pack to line up my holes for the Paper Studio brads.

The image panel is attached with foam pop ups.

Images: Biblical ImpressionsLion Kiss, Leafy Tree, Twigs in Snow
Paper: Stampin Up brown, DCWV – dark yellow, Marcos white, unknown glossy cardstock
Happy Saturday!!

I hope you are having a great weekend so far!!!

Since we are officially 4 days into summer I have a fun little summery card to share with you today.


Stamps:
Paper:
Bazzill Basics cardstock
Cosmo Cricket patterned paper
Neenah white cardstock
Ink:
Memento Tuxedo Black dye ink
Copic Markers
Other:
Jollee "bag" sticker

Thanks for stopping by!

Kristine

Orchid and Hummingbird


The hummingbird was colored first with Copic markers: R46, G05, G99, C35, 100 for the beak. Then Sticky Powder was applied to each piece using VersaMark pad or pen for ink and colored with Pearl Ex and I really like the way it came out. The pieces are assemble together with Aleene’s tacky glue and single sided tape and popped up with foam tape.

This is after I colored with Copics.

The orchid is colored with Prismacolor pencils: cream, jasmine, goldenrod, lilac and once assembled (using the glue) it was also popped up with foam tape.

The flower center is a piece of wire dipped in Aleene’s tacky glue and rolled in Lemon - Flower Soft.

The Sizzix Little Leaves die was shaded with the Prisma pencil kelp green then I flipped it over and embossed it with a metal ball stylus and glue them in place and worked in the Martha Stewart branch punch and just played with it until I liked it.
I used the Scor-Pal to emboss the grid. Tip: rubbing the cardstock with wax paper will help the stylus glide and seems to give me more control in any type of embossing by hand.

The pearls are self sticking.


This photo really gives you a nice view of the dimension of the card.  Obviously won't fit into an envelope but it sure will make a nice gift topper!
Eureka has a nice variety of 3D pattern images that are fun to put together.

Images: Eureka, 32001 Orchid Pattern, 31901 Hummingbird Pattern

Paper: unknown - white textured, The Paper Company - lilac, Stampin Up - white, greens, Marcos - white

Friday, June 24, 2011

3D Crafts are so Much Fun To Make

Today I have some great 3 d projects to share from Eureka Stamps.
I was so fortunate that Maribeth from QKR Stampede asked all of her design team members to work with the 3 d images.
So let me share some of the finished projects I made.

This first card was made with the fern and leaf set-I am showing several I made with plain card stock and also a pattern paper. I love that there is stitching on each frond and all I did was fussy cut and fold the piece.
The lion is also from QKR Stampede.

These two cards above were just so easy to put together and so fun to use on a card using the orchid pattern.. Papers are from CTMH and Hobby Lobby. Ribbon is from Really Reasonable Ribbon.
These are what the pieces look like after being stamped and cut out.You actually use the back side of the stamped images.
My last card was made with the daisy pattern .Paper and doily from my stash, ribbon from Really Reasonable Ribbon.
This is what the daisy looks like after being stamped and cut out.

That is what I have to share today from Eureka Stamps. I hope you check out the many 3 d images available- you won't believe how many there are in the store.

Lone Cactus


I paired up companies for this card, the cactus is QKR Stampede and all the grasses are Biblical Impressions.

This background is super simple to create and if you can tear paper and smear an ink pad on cardstock then you can handle a scene like this.

-The cactus is colored with Copic markers: C5, C7, G94, G99 then mask off using a sticky note.
-Tear paper to form a mountain effect (save the top half to use in another step) and cover the ground area, tear another piece to cover the ground area at the bottom of the mountain.
-Using the direct to paper technique, smear on the sky colors remove the mask and heat dry. If by chance you do not like your smear pattern - just do it again.
-With the opposite piece of mountain torn paper cover the sky area, tear a second piece to cover the ground below and smear on the color, remove the mask and heat dry. Continue the same steps for each color.
-Once all the colors are applied I touched up areas that may have been missed due to the cactus mask with either direct to paper or a small paint brush and ink from the pad. If you need texture on any of the colors here are a few ways to achieve it: coarse sponge, stamp a grass image using the same color ink, flair on the same color using direct to paper or add the same color ink and let it air dry.
-Stamp on your grasses, I also used an orange Sharpie marker to add some flowers.

The triangles are punched squares cut corner to corner. For the border on the image panel triangles I punched a half square using a ½” square punch lined up corner to corner while viewing the bottom of the punch, then punched a ¾” square above it and they were glued to the card.

The insert was colored with Copics: E49, YR15, B04

Images: QKR Stampede - 18608 Saguaro, Biblical Impressions - 38913 Grass, 38917 Grass, 38921 Grass, 38923 Grass, 38909 Grass
Paper: The Paper Company- blue, saffron, 80% glossy cardstock
Ink: Memento - Tuxedo Black, StazOn - Jet Black, Ranger distress ink - faded jeans, broken china, frayed burlap, vntage photo, spiced marmalade, rusty hindge
Accessories: The Paper Studio - brads, Aleene's tacky glue, foam pop dots, layered thick carpet tape (for right triangles)
Tools: Fiskars Leather plate, Cuttlebug, Stampin Up mat pack, 1/2", 3/4" 1" square punches, Bazzill piercer, sponges, heat tool/gun

Thursday, June 23, 2011

Flowers and Butterfly

With the color combo I think this would work to fill the need for a masculine card to a gardner.

The butterfly comes as three seperate rubber images.  I keep the pieces together as one piece of rubber for storage which takes the guess work out of what pieces go together. 

Copic markers were used to color the images: Y13, 38, YR04, 12, Y13, 38, E25, 29, 33, G94, 99

A metal ball stylus was used to emboss the butterfly.  I use a small ball stylus to mark my lines on the front of the image, turn it over and emboss between the lines with a larger sized ball stylus.  I use a folded paper towel as a cushion or a firm computer mouse pad will also work; to much cusion tends to tear the cardstock.

Stickles was applied to the butterfly.

The flowers were cut from a balloon image, embossed with a metal ball stylus and popped up on foam. The stems are from a Quikutz die named Flower Arrangement and they were sponged with ink.

I used the negative embossing technique on all embossed panels. The negative side/smooth/no bumps is inked up before the paper is inserted.


Images: Eureka Stamps - 29401 Butterfly Pattern, 13901(456) Daisy Balloon
Paper:Remember When – black textured, Bazzill – orange, Stampin Up – green, Marcos – white, unknown Kraft
Ink: Memento – Tuxedo Black, Ranger distress inks – spiced marmalade, dried marigold, tea dye, forest moss
Accessories: Copic markers, Aleene’s tacky glue, Stickles, nailheads, Aleene's Paper Glaze
Tools: Cuttlebug and embossing folders, Stampin Up embossing folder, metal ball stylus, sponge, Quikutz flower arrangement die

Running Thank You

So last week my 8 year old ran her first ever 5K. She was part of a program called Girls on the Run. It is a national program for girls in grades 3-8 that not only trains them to run a 5K, but talks about self-esteem, bullies, and may other issues that girls in that age group face. The idea of the race at the end is not to be the fastest, but to finish! They don't care how the girls finish, as long as they finish. Let me just say, if you have a child in this age group, and the program is offered in your area...DO IT! Well, today I wanted to share a card I made for my DD's coach. This wonderful women (also a mom with a child in the group) devoted 12 weeks of her time to work with the 12 girls in the group from the school. I really want to give her a giant hug for all she did, but I decided to make a card instead...lol. So, here it is....
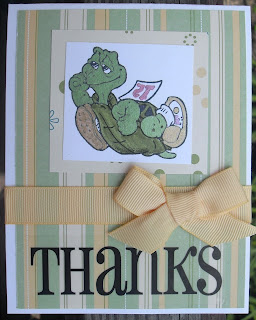
I thought this guy would be just perfect for a running card. Especially for this program...where it was all about finishing..not winning. So I used this adorable Slow and Steady turtle from the QKR Stampede store. I stamped him on some white CS, and colored with gel pens and markers. Next I layered the image onto some PP I had in my stash from SU. I thought the green in the PP went well with the turtle. Then I used a giant sticker for the sentiment, and added some ribbon. Now, I need to get this all filled out and in the mail...I am so bad about mailing cards.


Oh, one last thing before I go. I thought I would share this photo of my DD about to cross the finish line with her "running buddy". Look at that smile! She was beyond proud of herself for finishing...and in 40:45! Of course mom is also super proud! Thanks for stopping by!

Wednesday, June 22, 2011

Patriotic Horses from Biblical Impressions!

Hello Friends! 
Today is my first official post as a 
Biblical Impressions Design Team member! 
Biblical Impressions is a sister company
 to QKR Stampede and Eureka!
 They have a lot of lovely stamps!
 I hope you will head on over and check them out!
My card today uses the image Patriotic Horses.
 A great image for the horse lover you may know!

I love this image! 
I watercolored the image and doodled the 
barbed wire around the edges with a fine line black pen.
I made this card 5 x 7 to accommodate the larger image.
Thanks for stopping today!
See you next time!

Barb

Beautiful Butterfly Card

Hello all you beautiful people!

It wasn't hard for me to decide that I wanted this beautiful
"Butterfly Background" (#58501) from Eureka! Stamps.

I knew I would love using it and once I had stamped it onto watercolor paper and started to color it with my watercolor crayons, I loved it even more.
Inside I used:
"Happiness Like a Butterfly" (#40403) also from Eureka! Stamps
I love this beautiful sentiment.
Eureka! has many wonderful sentiments, if you are like me, and are short on sentiment stamps, Eureka! is the place to go!

To add the butterfly at the bottom of the inside, I stamped it with VersaFine Black Onyx ink onto white paper and fussy cut it.  Then adhered it with Tombow Mono Multi Glue.

Thanks for stopping by today.  I hope you enjoy my Beautiful Butterfly card as much as I enjoyed making it.

I'd love to hear what you think, so leave me a comment.
Until next time, Happy Crafting!


Rubber Stamping Catalog

Bet you thought you would find something else? Ha ha
Today I have a really fun and quick project to share- this bookmark was so easy to put together.
 Isn't this an adorable little girl reading the catalog?
Just colored with Copic markers and a little Liquid Glass to give some dimension. Image was cut with a Spellbinder shape.
I Googled corner bookmark and found several ideas but decided to create my own design.
Card stock and design paper were all from my stash. Ribbon is from Really Reasonable Ribbon, I just tucked a small piece in to the corner before folding.
Here are the links to QKR Stampede's 3 stores
QKR stampede Stamps
Biblical Impressions
Eureka Stamps

Also this QKR Stampede blog has 3 separate pages for each of the companies- The Links are Above (we hope you check them out)
QKR Stampede blog page
Biblical Impressions
Eureka Stamps

Tuesday, June 21, 2011

BI Lighthouse

Today I am sharing 37024 Lighthouse from Biblical Impressions. I watercolored the image and like how it turned out.
Thanks for stopping by,
Debbie

3D Shell birthday card


Good morning! It's Holly posting today, and I've got a summer-y card to share with you today.

This Shell Pattern is an awesome stamp from Eureka Stamps. You basically stamp it, color it however you want, and then follow the lines to cut and score it, and assemble it so it forms the 3D shape. So cool!

I colored this shell with some Distress Stains and then flicked some dark blue ink splotches over it. I paired this up with the Happy Birthday Script stamp and some fun twine with little shells on it. Below is a close-up picture of the 3D shell:


Check out all the neat 3D stamps in the Eureka store by clicking HERE. I've got a few more of these stamps and I'm working on putting some together. You'll see more in the next few weeks, so stay tuned. Have a wonderful week!

Stamps: 3D Shell Pattern and Happy Birthday Script from Eureka Stamps
Ink: Not Quite Navy, Antique Linen
CS: Not Quite Navy, White, Minuet dp (Memory Box)
Distress Stains: Weathered Wood, Peeled Paint, Wild Honey
Other: shell trim (Walmart)

Monday, June 20, 2011

ROAR!!!!

Hi there! Can you believe it is June 20th already???!!!! Only a couple more days of school for my oldest, then SUMMER VACATION!!!! Well today I wanted to share a card using one of the really cool 3D stamps from Eureka Stamps. If you haven't checked these out yet...you really need to. There are a good amount of them in the Eureka Stamps store. Basically...You stamp the image onto your CS, do some cutting and scoring, and you get a 3D project! Here is what I did with the Fern Leaf stamp. Neat huh? And this was honestly super easy! I stamped the leaf onto some green CS using green ink. I fussy cut the image, and scored along the dotted lines. Then I folded the scored lines. I wanted to add a little more, so I ink distressed the leaf too. 
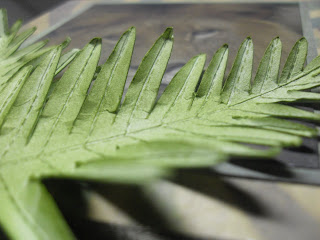
These ferns reminded me of a jungle, so I headed to my LCS and picked up some animal stickers. I used some PP from Tim Holtz, and put the lion sticker onto that. Then I added the fern leaf in front of him. Last I added some brown ribbon, and a button with fibers in it. Really this was very simple, and looks very cool! Be sure to check out the rest of the 3D and pattern stamps, and check back for more of the DT ladies to share some of these 3D and pattern images with you.

Inepti-toad

And once again we have Monday.
We had bad weather all weekend, it rained constantly. Hopefully there will soon be warm again.
Today I decided me for the image
"Inepti-toad". I must laugh when I saw the picture first.
"You look great today" ... whether the toad can laugh about it?


Have a nice week

Friday, June 17, 2011

Kitty Party

 Hi ,
Today is the third Friday and this is my day to show you something from the stamp shop Eureka! Stamps.
My daughter has today her 28th birthday, which is just the time gone?
Because she likes cats, I have chosen the 6 sweet cats for the birthday card. Are not they cute?


I like the cats ;-)
The name of the stamp is "Kitty Party" and you can buy this as rubber stamp or digi-stamp.
I colored this image with distress ink.

Have a nice day
Monika